Japanese Cooking 101, Lesson 3: Nimono (simmered dish) basics
This is Lesson 3 of Japanese Cooking 101: The Fundamentals of Washoku.
If you have been following along on Japanese Cooking 101, so far you have learned out to make proper dashi, the base stock used in many savory dishes in Japanese cooking (as well as miso soup and clear soup using that dashi), and also learned how to make proper Japanese style rice.
In Lesson 3 we'll be making vegetable nimono, one of the most common types of dishes found in washoku.
What is nimono?
The ni part of nimono (煮) means to stew or simmer. A nimono dish in Japanese cooking means that it's been simmered in dashi flavored with sugar, sake, mirin and soy sauce, plus some salt on occasion. The ratio of the flavoring ingredients differs according to personal taste, regional preference and so on but the basic combination is the same.
Making "2nd dashi" (niban dashi)
The dashi you use for making nimono can be regular "1st dashi", as we made in Lesson 1. But if you look back at that recipe, you'll see that we kept that used kombu seaweed and katsuobushi and stuck the little packet in the freezer:
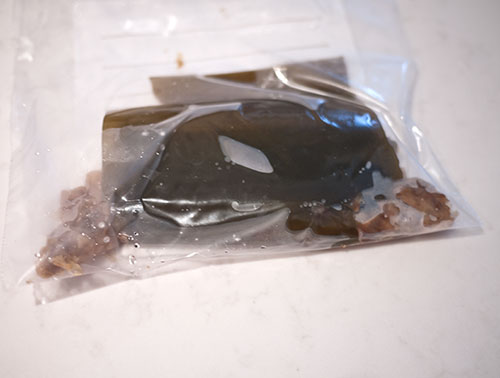
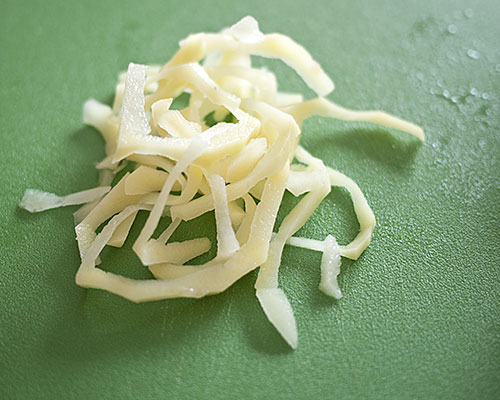
That once-used dashi ingredient mixture will yield even more goodness, called "2nd dashi" or niban dashi (二番だし). 2nd dashi is not as flavorful or refined as 1st dashi (ichiban dashi), but it's flavorful enough for simmering vegetables and so on where we'll be getting plenty of flavor from the ingredients anyway. Since I tend to make miso soup more frequently than nimono, I just keep the used kombu seaweed/katsuobushi in the freezer and pull out 2 of the little packs at a time to make niban dashi.
Making niban dashi is very simple. Just put it in as enough water as you need (for today's recipe we will be needing around 400 ml or about 1 3/4 U.S. cups, so add that plus a bit more to allow for evaporation) in the pan with 1-2 used-dashi-ingredient bundles. Bring to a boil, lower to a simmer, and simmer for 5-6 minutes. At this point you can put in a small handful of fresh (unused dry) katsuobushi (bonito flakes) to boost the flavor a bit, or even 1/4 teaspoon of dashi stock granules. Let the dashi ingredients settle down in the pan, then strain through a fine mesh sieve.
If you forgot to keep the used dashi-making ingredients, just make a batch of "1st dashi" following the Lesson 1 instructions. Water plus dashi stock granules is fine too, if not as flavorful.
So let's try making a potful of delicious simmered vegetables, Japanese-style!
Winter vegetable nimono
I stuck to using ingredients that 1. most people should be able to get a hold of, 2. that are inexpensive, and 3. don't need any pre-processing for this dish.
Yields: About 5 cups of cooked vegetables, enough for 2-3 Japanese meals as a side dish
Time required: 10-15 minutes prep time, 20-25 minutes cooking time (does not include time for making the dashi or soaking the mushrooms, which can be done in advance)
Ingredients
The cooking liquid:
- 400ml (about 1 3/4 U.S. cups) 2nd or 1st dashi stock (see previous section), or 400ml of combined shiitake mushroom soaking liquid and dashi, or 400ml water with 1/2 teaspoon dashi stock granules. (In other words, 400ml of liquid with flavor.)
The vegetables:
- 1 large or 2 medium carrots, peeled
- 1 large or 2 medium-small boiling type potatoes, peeled
- 1 medium onion, peeled and root end and top removed
- 4 small or 3 medium dried shiitake mushrooms, soaked in water until rehydrated, OR 4 small or 3 medium fresh shiitake mushrooms, OR 5-6 button mushrooms
- 3-4 snow peas or mange-tout, for garnish (Other garnishes you could use: small broccoli florets; green beans. Or for uncooked garnishes, chopped up green onion or mitsuba would work.)
The flavorings:
- 1 teaspoon sesame oil, olive oil or vegetable oil
- 1/2 tablespoon white or raw sugar
- 1 tablespoon sake
- 1 tablespoon mirin
- 2 tablespoons soy sauce
- salt (optional)
Equipment needed: Cutting board, sharp kitchen knife, a small saucepan, and an otoshibuta - which I'll explain below.
Proper traditional Japanese cooking (washoku) is all about getting little details right. They really don't have to take a lot of time once you've learned them, but they make all the difference both in taste and texture, as well as final presentation. If you want this dish to turn out as nicely as it can, please read through and follow the cutting instructions. Of course it will all turn out pretty good even if you cut up the vegetables the way you want to...but humor me and follow along at least once. ^_^
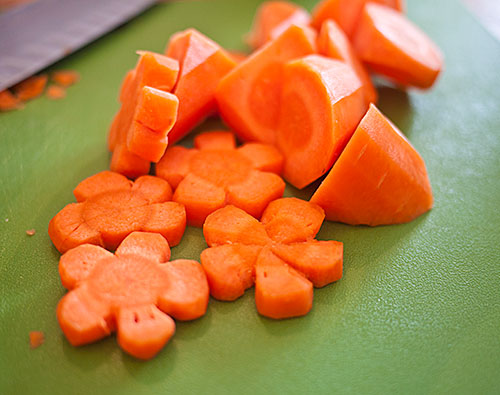
1. Cut the carrots.
The most common cut used for carrots in stewed dishes is called ran-giri (乱切り) which means 'random cut' or 'rough cut'. You want each piece to be fairly even in size, but with multiple surfaces so that they cook evenly. It's quite simple to do: Put your peeled carrot on the board, and cut at even intervals while giving a quarter-turn to the carrot each time.
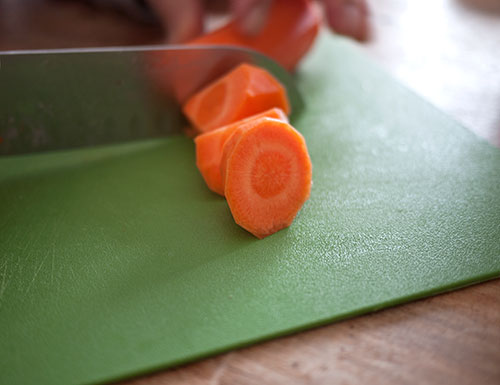
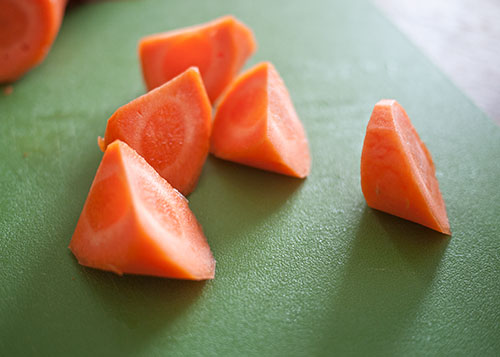
You'll end up with pieces like this...
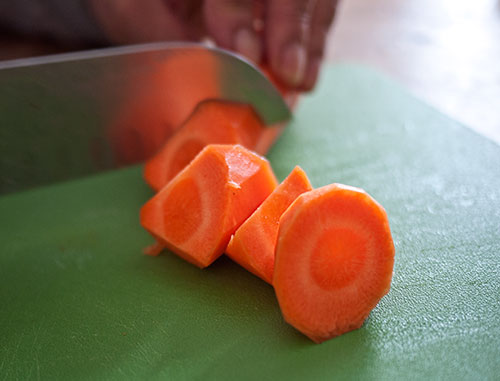
...sort of trapezoidal in shape. These pieces cook very nicely and evenly. (I cut my carrots like this for curry too.)
Now this is very much optional, but if you want to give your final dish an extra flair cut some regular round slices from the carrot and make some flowers out of them. I didn't include the cutting how-to here since it was already way too long, but if you have some small bento cutters you can just cut out some flowers or other shapes (see this post for example.)
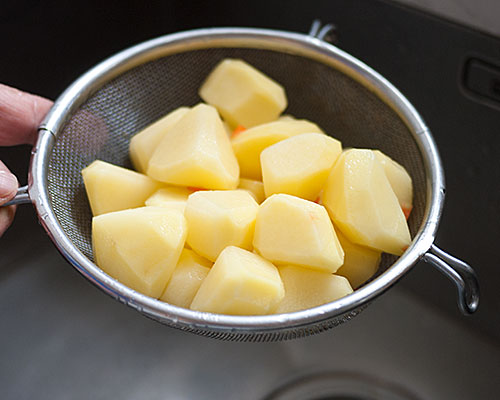
2. Cut and prep the potatoes
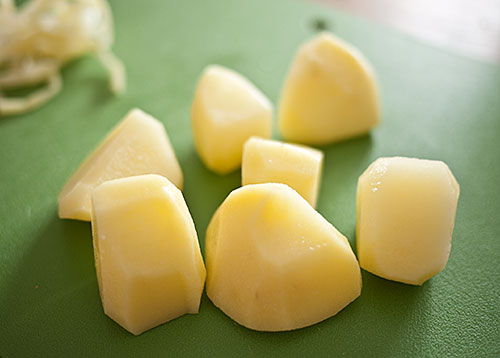
Next up are the potatoes. After peeling them, cut them into fairly even pieces like so:
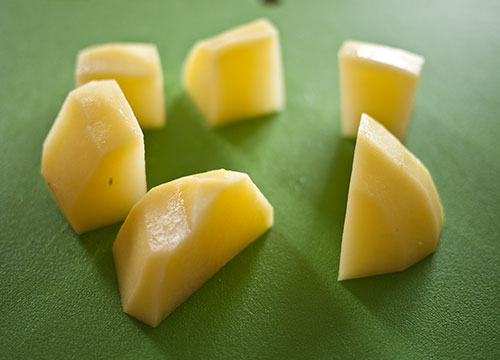
The next step is optional but will really make the final dish that much better. Since potatoes are starchy, the sharp cut edges tend to melt and disintegrate into the cooking liquid. This makes them look a bit messy, as well as clouding the liquid. To prevent that, just shave the edges of each piece to round them off. This cutting method is called mentori (面取り) - 'taking off the edges'.
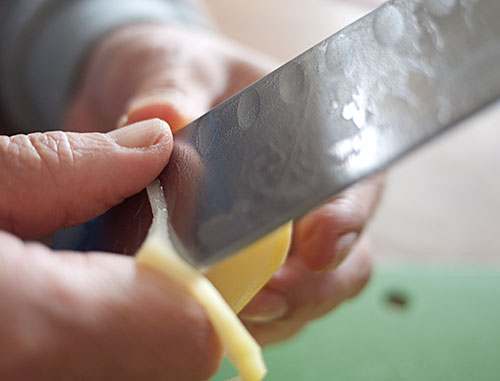
The potato pieces will look like this. The reasoning behind this is related to the reason why vegetables are 'turned' in classic French cuisine but it's a lot more simple to do. It's not necessary to "mentori" all vegetables - carrots for instance stay firm and intact after cooking unless you overcook them. The most commonly "mentori"-ed vegetables are the starchy ones like potatoes and kabocha squash, plus daikon radish - the ones that literally tend to lose their 'edge' during cooking.
But a frugal Japanese home cook doesn't throw away the trimmed edges. Save them for a soup or a stir-fry by rinsing off the starch in water (to prevent them from browning) and wrapping tightly.
Put the cut up potato in a bowl of water, and then drain to rinse off the surface starch. This step will make the final dish that much more clear shiny. Don't let the potato bits soak too long in the water though - we don't want them to get waterlogged.
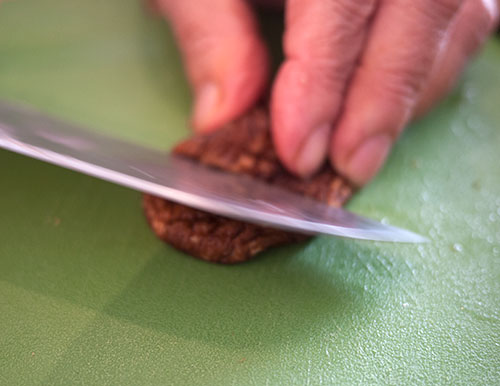
3. Cut the shiitake mushrooms
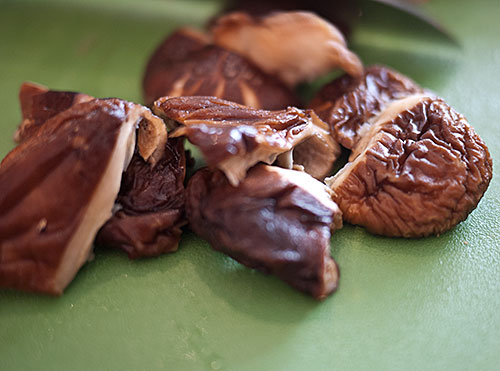
Tightly squeeze out the rehydrated dried shiitake mushrooms, saving the soaking liquid. Cut off the stem, which is usually too chewy even after rehydrating. Cut each cap in half - but instead of just going straight up and down, make a slanted 45 degree cut.
The reason for doing this is purely for aesthetics. The diagonal cut shows off the pale beige inside part of the shiitake, which offsets the dark brown cap nicely. A small, simple yet nice decorative touch. Do this cut for fresh shiitake also. Regular white button mushrooms can just be sliced in half (you can leave the stems on); if you have brown cap mushrooms the diagonal cut may work well too.
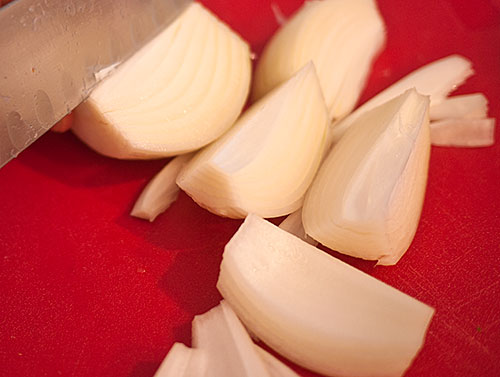
4. Cut the onion.
Just cut the onion into 1/8th wedges.
5. Let's cook some nimono!
Once you've prepped the vegetables, the cooking is pretty easy.
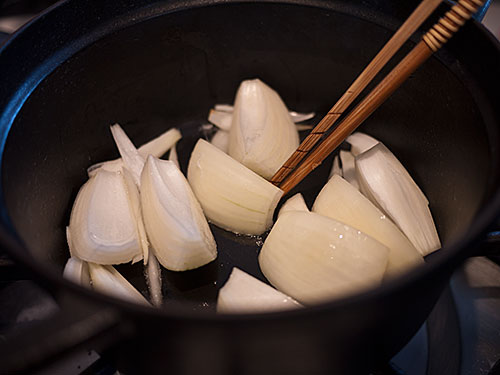
Heat up your pan with the teaspoon of oil. Sesame oil will add a bit more flavor, but any vegetable oil is fine here. (Olive oil is great too.) Put the onions in first and stir around for 2-3 minutes until the edges start turning a bit translucent.
Add the potatoes and carrots and continue stirring for a minute. This short sautéing step helps to bring out the sweetness of the vegetables.
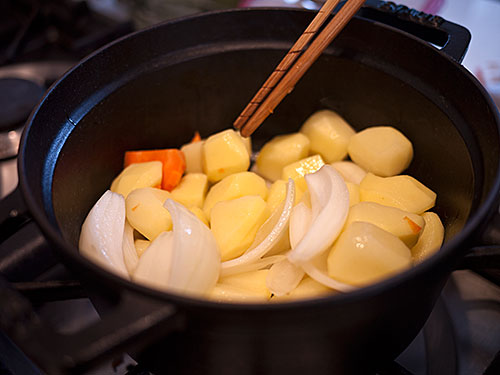
Add the mushrooms and stir a bit more.
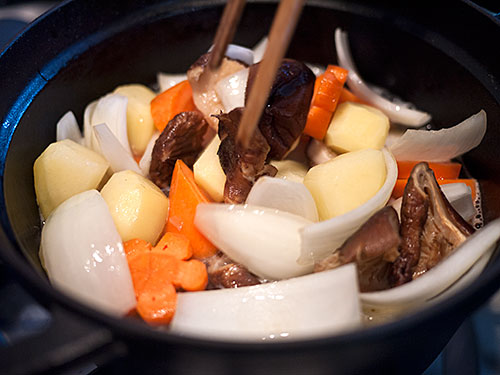
Add the dashi stock (or combined dashi + mushroom soaking liquid). There should be enough to just about come to the top level of all the vegetables in the pot - if there's not enough, add the a bit more dashi or even plain water, but do not overfill with liquid or the end results will be rather blah.
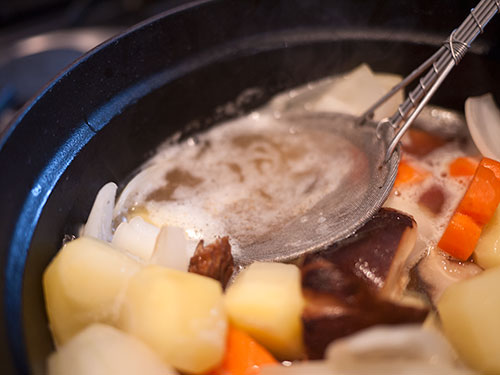
Bring it up to a boil and lower the heat to a simmer. Some scum will rise to the top, which should be removed so that the final dish will have a clean taste and appearance. I use this specialized scum-scooper ladle but any ladle will do fine - even a large spoon will work. Try to take off just the scum and leave the liquid.
Add the flavoring ingredients in this order: sugar, mirin, sake, and then finally the soy sauce. You can even reserve the soy sauce until the very end to retain its maximum fragrance if you prefer. I just dump it in at this stage though.
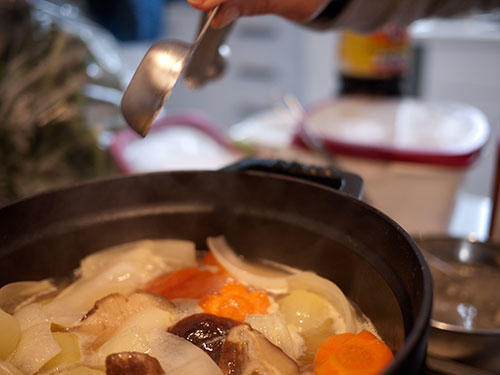
Finally we want to let it simmer on its own. But before we leave the pot, let's put on an otoshibuta (落としぶた) or "dropped lid". This is one of the things that may be unique to Japanese cooking, although other cuisines use similar techniques sometimes. It's essentally a lid that is smaller than the diameter of the pot, that is placed directly on the surface of the food that's being cooked. it prevents the surface from drying out, allows moisture ton condensate on the backside and then drop back into the cooking liquid, and keeps the ingredients in the simmer from shifting around and falling apart. I've explained the otoshibuta several times already on this site, and used it whenever I've made a simmered dish. The most traditional type of otoshibuta is made of wood - but it's still hard to get one of these outside of Japan. But a makeshift one works just as well really. The simplest form of makeshift otoshibuta is simply a pot lid that belongs to a pot that's smaller than the one you're using, preferably one. You can also use a piece of crumpled up aluminum foil or kitchen parchment paper with a couple of holes punched into it for ventilation.
I do happen to have an otoshibuta, which I bought in Japan...it's made of silicone. The 'handle' part is a pig face, with the snout acting as ventilation holes. It's also a pun, since the word for pig in Japanese is "buta". So...otoshibuta... ^_^; (OK so I do like my silly puns.)
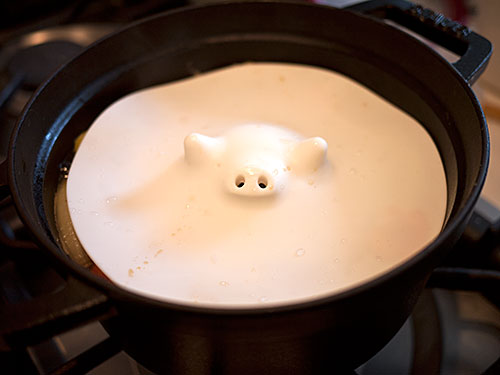
So, leave the pot to simmer with the dropped pig...I mean, dropped lid on top, for around 20 minutes. If the heat is too high, lower it or take the pot off the heat for a couple of minutes before putting it back on. You may want to give it a stir up from the bottom halfway through. (Experienced cooks can take the pan and give it a good toss to mix the contents up, but don't do this unless you are confident you can.)
In the meantime, blanch 3-4 snap peas (or other greenery you are using as garnish) in boiling water for a minute or two, and set aside.
Come back to check on how tender the vegetables are, and if they are done turn the heat off and let it rest for a few minutes. Taste a potato and see if it needs a touch more soy sauce, or even a pinch of salt, and adjust according to your taste.
6. Finishing up
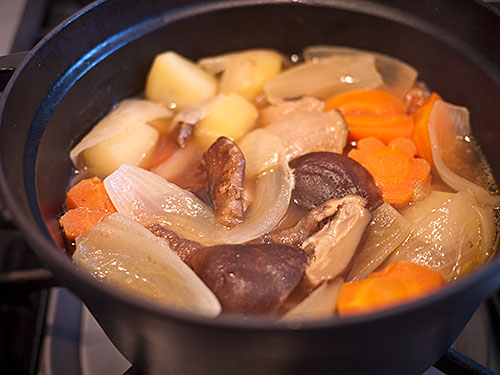
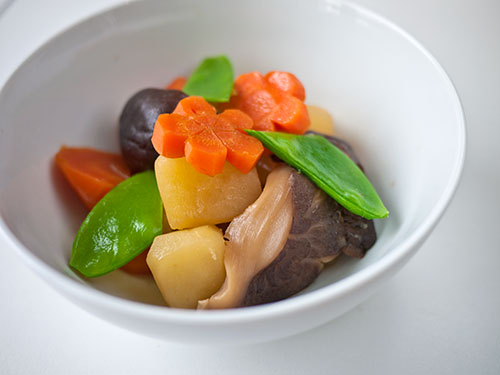
Arrange the vegetables attractively in a bowl, pouring a little of the cooking liquid over it to add shine and flavor. Garnish with the snow peas or other green garnish of your choice to make it "pop".
Store any leftover nimono in the cooking liquid. It will improve in flavor that way. Nimono like this will last in the refrigerator for at least 3-4 days, so make enough to use in a couple of meals and bentos. After a couple of days you may want to heat it through before using.
Nimono summary
- Use 2nd dashi or niban-dashi to be frugal
- Cut the vegetables according to their nature; shave the edges off the starchy ones
- Sauté the vegetables in a little oil to bring out their flavor and to add more flavor from the oil
- Add the soy sauce last, to retain its flavor. Add the sugar, sake and mirin first. (See also: SaShiSuSeSo.)
- Use an otoshibuta (dropped lid) while simmering
- Use some green garnish to make the final dish pop.
- It's worthwhile making nimono in some quantity, since it tastes better the next day and keeps for several days in the refrigerator. Reheat before eating at home, or reheat then let cool down again if using for bento.
This basic procedure is the same for most kinds of nimono, whether they are all-vegetable or have some meat or other protein such as tofu in them.
As usual, please leave any questions, etc. in the comments below or on the Facebook page!
Submitted by maki on 2013-03-25 15:51.

 Welcome to Just Hungry, where we serve authentic Japanese recipes and more! I'm


Comments
J B
25 March, 2013 - 20:48
Permalink
Re: Japanese Cooking 101, Lesson 3: Nimono (simmered dish) ...
Thanks again, Maki.
I learn something new every time I visit this site. I never had an otoshibuta, but I'm adding one to my kitchen now.
If anyone wants the real thing, there are several "otoshi buta" (you have to separate the words in a search) on the US eBay website, both traditional wood and the silicone piggy in white or pink.
Holly
25 March, 2013 - 23:16
Permalink
Re: Japanese Cooking 101, Lesson 3: Nimono (simmered dish) ...
I ran across your cooking about a week ago, and silently 'joined in', making making rice, tuna sushi and the dashi stock.
Tonight, I finally made miso soup, and the simmered vegetables. Tonight I also made more rice, and steamed a bit of tuna left over from making sushi. I had marinated the tuna in sake & soy sauce, and steamed it a bit tonight for my meal. It was all very wonderful - and the smells of it cooking brought back so many happy memories of when I lived in Japan for 2 years, now over 20 years ago.
Thank you so very much for all the time and effort you put into creating this class!
E
26 March, 2013 - 00:24
Permalink
Re: Japanese Cooking 101, Lesson 3: Nimono (simmered dish) ...
This looks really yummy! Thank you for sharing such lovely cooking could this dish be frozen and if so would you freeze it in the liquid?
maki
26 March, 2013 - 03:55
Permalink
Re: Japanese Cooking 101, Lesson 3: Nimono (simmered dish) ...
I would never freeze something with potatoes in it, because they turn out mushy and grainy and horrible. A nimono dish with no potatoes can be frozen successfully though.
anon.
26 March, 2013 - 12:41
Permalink
Re: Japanese Cooking 101, Lesson 3: Nimono (simmered dish) ...
Great explanation, thank you!
anon.
26 March, 2013 - 18:37
Permalink
Re: Japanese Cooking 101, Lesson 3: Nimono (simmered dish) ...
Don't throw out the cut-off rehydrated shiitake stems! Collect and freeze them. When you have enough (at least half a cup) throw them in 2 cups of water and bring to a boil. Simmer them to death and use the mushroom liquid as a base for miso soup, or for rice water.
Those dried mushrooms are flavor powerhouses, it's amazing how much you can extract from them.
John Corbally
27 March, 2013 - 03:34
Permalink
Re: Japanese Cooking 101, Lesson 3: Nimono (simmered dish) ...
My daughter is allergic to mushrooms, and the shitake seem to be a vital part of this dish. Is there any substitute that would make sense for the shitake here?
:)
maki
27 March, 2013 - 06:00
Permalink
Re: Japanese Cooking 101, Lesson 3: Nimono (simmered dish) ...
You can just leave it out and it will still taste good, provided you have a good dashi base. You can also put in some boneless chicken or something too.
anon.
27 March, 2013 - 06:58
Permalink
Re: Japanese Cooking 101, Lesson 3: Nimono (simmered dish) ...
Hi love your site and am enjoying this class. What do you do with the nimono cooking liquid? The picture of the finished dish didn't seem to have much of the nimono stock served with the veggies.
maki
27 March, 2013 - 09:50
Permalink
Re: Japanese Cooking 101, Lesson 3: Nimono (simmered dish) ...
I did pour a little bit of the cooking liquid on top of the vegetables, which gave them a bit of shine. The rest was kept with the remainder of the nimono, which I stored in the fridge for later use. That way the veggies absorb even more flavor from the liquid.
Asu
29 March, 2013 - 11:04
Permalink
Re: Japanese Cooking 101, Lesson 3: Nimono (simmered dish) ...
I just tried that recipe some days ago - and loved it!!
Really easy to prepare and I love that it keeps a few days without any problem - and get even better. :D
Put a bunch of them into my Bento - yum yum yum...!
Sylvia S. B. S.
31 March, 2013 - 04:36
Permalink
Re: Japanese Cooking 101, Lesson 3: Nimono (simmered dish) ...
The potatoes. As an occidental potato eater, it never occurred to me that potato edges were doing anything "bad" but rather apparently added to the thickening of stews using potatoes, etc. Trimming all the edges has to be a very novel idea to us westerners. The obvious difference is the aim of having a clear, not cloudy, broth. Wow!
Cubing potatoes for cooking, potato salad, etc. is just how "it's done." Nevertheless, the next time I use fresh potatoes in a recipe, I'll try cutting off all the edges to see what happens.
Your new series of cooking on both websites is a wonderful idea. As a long-time reader, I appreciate every one of your ideas, even if I'm not ready for squid.... I do have several bento boxes and your book. Carry on!
frankncents
2 April, 2013 - 07:21
Permalink
What goes well with nimono?
This sounds delicious, and I am totally psyched to try it out for dinner tomorrow. My question is, what should I serve with it? I'm assuming rice, but I know my family wants protein with every meal - can I throw some fish or chicken in with the vegetables, or is this really meant as a side dish, with something else (with a different flavor profile) to accompany?
maki
2 April, 2013 - 13:42
Permalink
Re: What goes well with nimono?
An all-vegetable nimono is often served as a side dish, with a protein dish as the main. I'll have a 'how to put a Japanese meal together' lesson at the end of the Japanese Cooking 101 run also.
anon.
3 April, 2013 - 03:16
Permalink
Re: Japanese Cooking 101, Lesson 3: Nimono (simmered dish) ...
Why does the sugar, mirin, sake order matter? Thanks.
maki
3 April, 2013 - 03:26
Permalink
Re: Japanese Cooking 101, Lesson 3: Nimono (simmered dish) ...
They are put in in that order according to how long it takes for each ingredient to be absorbed by the main ingredients, and how sensitive they are to heat. Sugar tekes the longest and has to melt besides. Mirin is in between, then sake (although the mirin-sake order is not that critical), Soy sauce is put in last since its flavor and aroma tend to dissipate a bit if you apply heat for too long. The same goes for miso, which is also added last.
anon.
3 April, 2013 - 21:32
Permalink
Re: Japanese Cooking 101, Lesson 3: Nimono (simmered dish) ...
Thank you. That makes sense now.
LizW
9 April, 2013 - 16:27
Permalink
Re: Japanese Cooking 101, Lesson 3: Nimono (simmered dish) ...
I'm getting behind again, but tried a batch of this last night. I made mine with kohlrabi as well as the suggested ingredients, because I had some that needed eating up.
I packed lots into my bento today, and it was really tasty... Definitely a flavour that just doesn't crop up in Western cooking. It'd never usually occur to me to put a bunch of boiled root veg in my bento, but cooked like this they worked very well.
http://www.flickr.com/photos/9043927@N05/8634562584/
(It wasn't really that yellow-y - although I did use dark soy sauce - I blame the lighting in my kitchen!)
Andreas Franzen
9 April, 2013 - 22:26
Permalink
Re: Japanese Cooking 101, Lesson 3: Nimono (simmered dish) ...
Hi,
thank you for those cooking lessions !
Me and my family enjoyed it a lot.
But with one exception: the shitake mushrooms in the nimono.
They were way too chewy, especially for my kids.
(Taste was okay, though)
I bought mine at a korean shop - they were labeled tongo-mushrooms/shitake-mushrooms.
Were they just the wrong kind, or am I overlooking something ?
maki
9 April, 2013 - 23:50
Permalink
Re: Japanese Cooking 101, Lesson 3: Nimono (simmered dish) ...
It could be that you needed to soak them for a longer time. How long did you leave them in the water? They should be completely soft all the way through with no hard insides before you use them.
Eri
30 April, 2014 - 16:55
Permalink
Re: Japanese Cooking 101, Lesson 3: Nimono (simmered dish) ...
Having grown up in Japan, I've always missed nimono but could never have it in the US. I tried making this last night for dinner, substituting daikon for potato and it was AMAZING. I can't even tell you how happy I was. I almost cried. lol! Thank you SO SO much for sharing (so beautifully) your cooking with us. <3